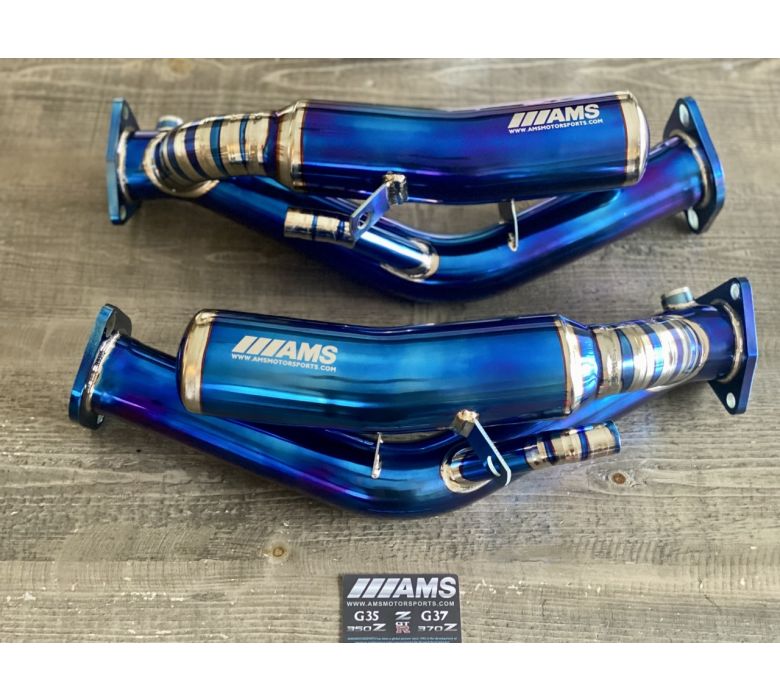
AMS SEKUSHI TEST PIPES 350Z, VQ35DE - Nissan 350Z / Infiniti G35
Special Price
$545.00
Regular Price
$895.00
Availability : In stock
AMS SEKUSHI TEST PIPES 350Z, VQ35DE - Nissan 350Z / Infiniti G35
AMS SEKUSHI TEST PIPES 350Z, VQ35DE - Nissan 350Z / Infiniti G35
Prepare for the ultimate “SEKUSHI” Test-Pipes for your DE! Japanese for Sexy, these units are without comparison on the marketplace! You get everything with these Test Pipes not offered with the competitors including Motordyne/ART! We looked at all the offerings on the market over the years and incorporated what was lacking into making these these “Perfect” – improving on all the shortcomings of others. The Design incorporates sound perfecting harmonics for a deep, quiet and non-raspy ton while extracting Maximum Power! The features are abundant and superior to the competitors. We even offer a World First and exclusive all Titanium Version for the hardcore enthusiasts. Also another World First is the SS Heat shield options! The Titanium will offer maximum weight savings and sound. Our Stainless Steel Versions are true T304 SS not the cheaper Stainless used by everyone else including Motordyne/ART/Torquen. Our Sekushi Flanges are real T304 SS also and not mild steel that is chrome plated like Motordyne/ART and others. See the pictures to compare – Cheap chrome on the right (Motordyne/ART) and AMSMOTORSPORTS SEKUSHI Pipes Real T304 SS Flanges. The support Brackets on the Sekushi Pipes are also T304 SS.
• INCLUDED are Fasteners and Gaskets!
• T304 SS Construction throughout
• The flanges on our AMSMOTORSPORTS versions are real T304 also instead of mild steel that is chromed like the competitors.
• Laser TIG welds are superior to the cheaper versions also. See pictures for comparison of AMSMOTORSPORTS vs. MOTORDYNE/ART/Torquen
• extra Oxygen sensor bungs on each side for wide band sensors (Not offered on Competitor Models)
• hanger/flanges made of T304 SS unlike the cheaper competitor models
• 1 lb lighter than the competitor versions (SS), Titanium Version is combined
5.95 lbs for both which is 60% lighter than Motordyne/ART pipes.
• AVAILABLE IN T304 SS, FULL TITANIUM**, and another industry first Metal Heat Shield** Option for SS Models! ** Special order options will take several weeks to build and non-refundeable
• No ridiculous wait times.
• Special Order Options IN FULL TITANIUM , and another industry first Metal Heat Shield Option for SS Models! These will take several weeks to build and no-refundable!
• FITMENT (DOES NOT FIT AWD):
2003 - 2006 350Z VQDE
2003 - 2007 G35 VQ35DE
*** REV UP MODELS MANUAL ONLY ***
*****PROFESSIONAL INSTALLATION RECOMMENDED! DRIVER SIDE FLOOR PANEL STUD NEEDS TRIMMING/REMOVAL FOR CLEARANCE! RE-USE FACTORY DAMPENING BRACKET OR WARRANTY WILL BE VOIDED! TORQUE BOLTS TO 60/70 FT/LBS AND RE-CHECK AFTER 100+ MILES. If exhaust is bottoming out due to lowered vehicle warranty will be void as well ****
STANDARD SHIPPING when items not in stock is approx 4-5 weeks and considered "Special Order". In Stock it will be shipped ground shipping.
EXPRESS SHIPPING when not in stock is approx 1-2 weeks AIR EXPRESS.
AMSMOTORSPORTS Sekushi Pipes Installation Notes
Tools and Preparation
Tools Needed: Jack and jack stands, 14mm and 16mm wrenches/sockets (deep sockets and swivels recommended), O2 sensor socket, and a cutting tool (Dremel or hacksaw).
Safety: Allow the exhaust system to fully cool before touching any components. Spray all nuts and bolts with a penetrating fluid like PB Blaster and let them sit for at least 15–20 minutes.
Step-by-Step Installation Process
Remove the OEM Cats:
Safely raise the 370Z on jack stands. Disconnect the front and rear O₂ sensors (easiest by unplugging the wiring harness clips first to avoid twisting the wires) and unscrew them. Unbolt the 3 bolts connecting the test pipe to the exhaust manifold (top and bottom) and the 2 bolts connecting it to the cat-back exhaust.
Clearance Modifications (Crucial):
On the driver’s side floor panel heat shield, there is an M6 stud protruding down about 1 inch. This will interfere with the AMSMOTORSPORTS Sekushi pipe. You must cut/trim this stud flush to the heat shield panel to allow proper clearance.
Install the AMSMOTORSPORTS Sekushi Pipes:
Transfer the O₂ sensors over to the new AMSMOTORSPORTS Sekushi Pipes. Apply anti-seize to the sensor threads, taking care not to get any on the sensor tips. If not using the extra Wideband bungs secure with blue lock-tite.
Hardware and Fasteners:
Install all bolts finger-tight first so you can rotate and align the pipes properly. Ensure the vibration-damping bracket on the side branch resonator is connected to the catalytic converter brace.
Tighten Down:
Tighten all bolts working front to back (starting at the engine inlet and ending at the outlet) to approximately 70 ft/lbs of torque. Reconnect the O₂ sensor wire harnesses.
Final Checks:
Start the car while it is still on jack stands and check for any exhaust leaks around the gaskets. After driving about 100 miles, re-check and re-tighten all bolts to ensure a permanent seal.
| ETA Production Date | Jul 10, 2026 |
|---|
Write Your Own Review